This next part of the Cupcake Fairy Costume is my favorite... wings! I was worried that this wouldn't work but it turned out great and was actually pretty easy.

Materials Needed:
- tulle
- hot glue gun
- fabric scraps from the appliqued onsie
- two strips of 1/4" elastic cut to fit around you child's shoulders
- floral wire
Floral wire is a thick wire like barbed-wire but it cuts and bends easily. It come in silver, gold, copper and green. I liked the green and it happened to cost the least.

Start off by cutting two pieces of wire at the same length. Length will depend on the size you want the wings to be. Then cut two more pieces of wire, also the same length but a couple inches shorter than the other set of wire.

Take one piece of wire and wrap one of the ends around the other. Do the same with the other wire of the same length.

Mold one wire loop to the shape you want then use that as a template to mold the other wire. You need them to be as close to the same shape as possible. Repeat these steps with the other two wires.
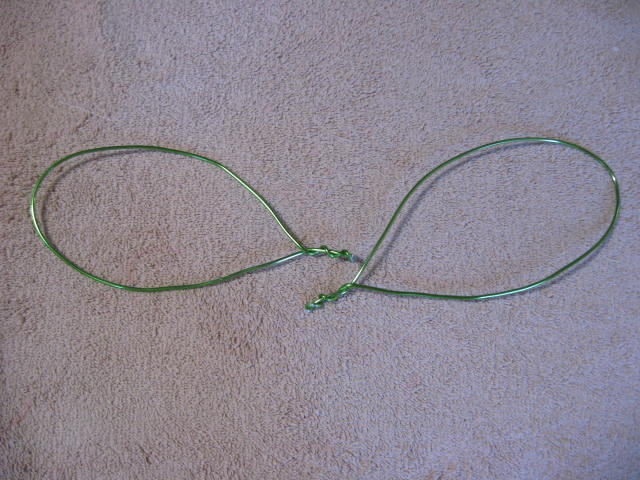
When you put the wings together they should mirror each other. These loops are for the top part of the wings.

Lay down a square piece of tulle. It is better to have excess because you can trim it away later. Arrange the wire loop so the tip of the wing is in the center of the square of tulle. Dot as little hot glue as you can on the tip of the wing and stick it to the center of the tulle square.

Pull the tulle down over the wire and bring together where the wire is twisted together. Secure with a rubber band.

Repeat with all the loops. Your should have 4 pieces of wings that look something like this.

Scoot the rubber band down a little and glue around the base of the wing. Once the glue cools a little but is still soft, squish the glue into the tulle and wires with your fingers. Trim the tulle to make it less bulky. Repeat with all the wings.

Arrange the wings with the two larger wings on the top. Glue one top wing to the base of the bottom wing so the top wing laps over the top of the bottom wing. Repeat with the other set.

Glue the two sides together. Don't worry if it looks messy at this point.

Glue the elastic to the wings so the loops are on the side that will be against your child's back. Make a small square of the fabric scraps that has the fusible interfacing on it (this will help prevent fraying) to the wings where the elastic ends are to help keep them attached.

Then cut another scrap of fabric with the interfacing and wrap it around the center of the wings. Glue down with the seam on the side that will go against your child's back.

Now you have a beautiful pair of fairy wings!
There is one more part to the Cupcake Fairy costume coming soon (hopefully tomorrow)! This will include pictures of a very cute Cupcake Fairy.
Wow! I can't believe you made these! I am too lazy, I would end up just buying them. This is an awesome tutorial though :)
ReplyDeleteBekah
If Work Permits