Thursday, October 20, 2011

Home - Made Oreo Cookies

I went on a hunt for home-made Oreo cookies when I was still pregnant.  There are many recipes out there but all of the ones I found had cream cheese in the frosting.  Most of you are probably trying to figure out why that would be a problem because it seems that everyone in the world LOVES cream cheese... except me.  I don't like the taste, smell, texture or the way it coats your mouth.  And I'm sorry but the real Oreos don't have any cream cheese in them either.  You can imagine my happiness one day when I found it.  "It" being a recipe that didn't require cream cheese for the filling!  Hallelujah we have a winner!  Since this was months ago I don't remember where I found this recipe, or I would give the author credit...
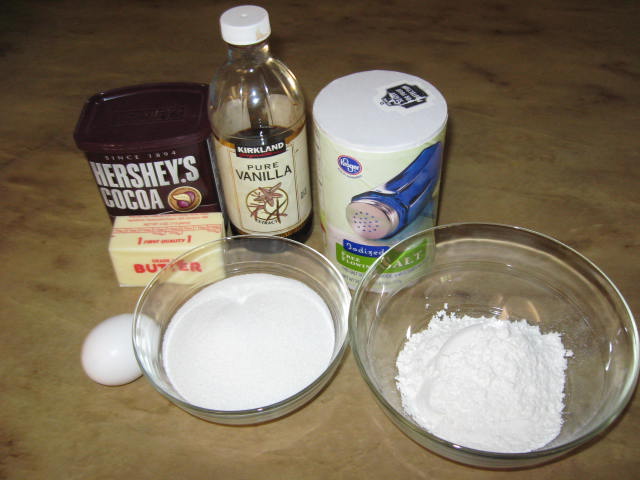
Mmmm doesn't it look delicious?  Two crispy cookies with a creamy center.
INGREDIENTS
Cookies:
  • 3/4 cup all-purpose flour
  • 2/3 cup cocoa powder
  • 1 stick softened salted butter (you can use unsalted and add about 1/8 teaspoon of salt to the flour mixture)
  • 1 cup sugar
  • 1 egg
  • 1/2 teaspoon vanilla extract
Filling:
  • 1/2 stick softened butter
  • 1/4 cup vegetable shortening
  • 1 1/2 cups powdered sugar
  • 1/2 teaspoon vanilla extract

We'll start with the cookies:
In a medium sized bowl, sift the cocoa and flour (and salt if you are using unsalted butter) together.  I used a fork rather than an actual sifter.
Cream the softened butter and sugar together in a mixer.  Once the mixture is well combined and has started to cream, add the egg.  Let it cream together.  Add the vanilla and mix a little bit more.
Add the dry ingredients and mix just until incorporated.  You'll probably need to scrape the bottom and sides of the bowl with a rubber scrapper.  The dough should look slightly thicker than brownies and be really sticky.
Split the dough in half the best you can.  Put one half on a floured sheet of wax paper.  Flour another sheet of wax paper and lay it on top.
Roll it out so it is about 1/4 inch thick. Do this again with the other half.
See how sticky it is?  Without the wax paper the dough would stick to the counter and rolling pin.  In order for the dough to be workable, stick the rolled out dough in the refrigerator for at least one hour.  The dough should be stiff with a little give.
Once the dough is cold and has stiffened, it should peel of the wax paper pretty freely.  Remove just the top piece off wax paper at this point.
Working quickly, use a round cutter to get circles and place two inches apart on a baking sheet.  My circles are two inches in diameter.  I wouldn't go any larger because they do spread out a bit in the oven.  Refrigerate for 20 minutes more before baking for 20 minutes in a 325 degree oven.

Note:  If you line your baking sheets with foil, clean up is a lot easier.
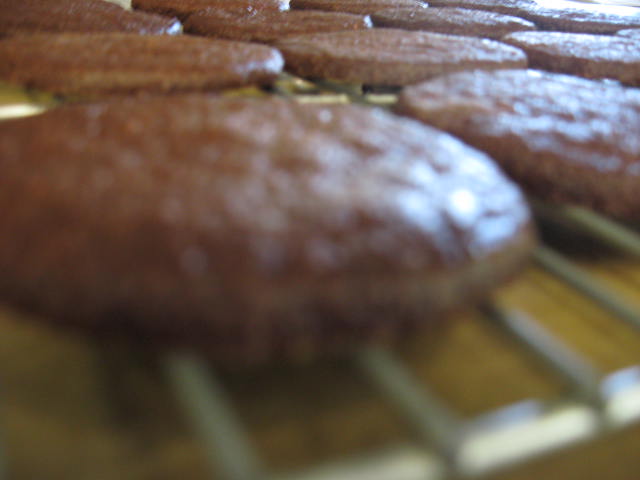
When the cookies are removed from the oven and completely cooled on wire racks they should be crispy.

Now for the creamy filling:
Cream the butter and shortening until they become fluffy.  Then beat in the powdered sugar and vanilla. I added some orange food coloring for Halloween at this point.  It's hard to see the color because I don't like to add a lot.  I think too much food coloring makes it taste bitter... does anybody else think this or is it just me?
Put the frosting in a baggie and cut the corner.  This will make frosting the cookies much easier.
Line the cookies up on the cooling racks.  I play around with them a little bit to match the circle sizes.  Some might be a little wider or smaller if the dough was rolled out thicker or thinner than 1/4 inch.  Then flip one cookie in each pair over.  Squeeze out a blob of frosting on the flipped over cookie.  Place the other cookie on top and squish down the frosting.
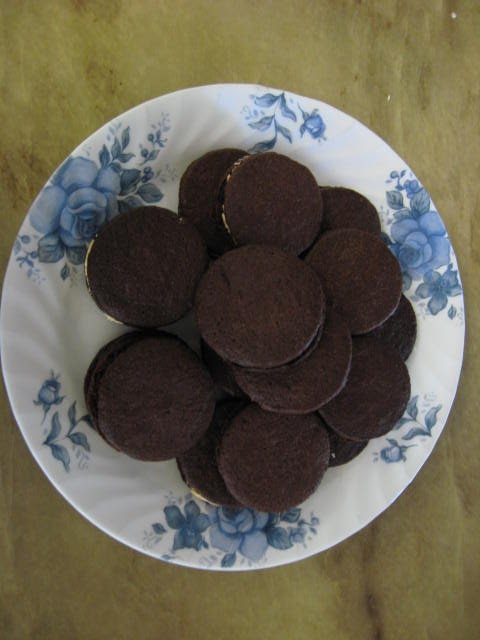
My dough made about 32 cookies with dough to spare.  Because I used 2 cookies per "Oreo" so I ended up with 16 sandwich cookies.

Recipe Text:

Cookie Dough-
Sift the cocoa powder and flour (and 1/8 teaspoon salt if using unsalted butter) in a bowl.

In a mixer, cream the butter and sugar.  Add the eggs and cream together.  Add the vanilla and continue to cream.  Add the dry ingredients and mix until just incorporated.

Divide the dough into two.  Place one piece between two floured pieces of wax paper.  Roll into 1/4 inch thick.  Repeat with the other half of dough and stick both sheets of dough int the fridge for at least an hour or overnight.

Cut the dough into an even number of two inch circles.  (Re-roll and refrigerate the scraps to get more cookies.)  Place on an ungreased baking sheet two inches apart.  Refrigerate for an additional 20 minutes and preheat the oven to 325 degrees.

Bake the cookies for twenty minutes.  The edges should be SLIGHTLY darker than the middle (I could barely tell there was color change, and they were perfect).  Let cool completely on wire racks.

Cream Filling-
Using a hand mixer, cream the butter and shortening until fluffy.  Beat in the powdered sugar and vanilla (and food coloring if desired).

Flip half of the cookies upside down and top each with a dab of filling (about one tablespoon).  Press the other cookies on top.

Tuesday, October 18, 2011

Cupcake Fairy Costume: Part 4: Fairy Wand

Have you ever done a project where you burned yourself on a hot glue gun... twenty times?  Well that's how this project went for me.  I didn't burn myself on the fairy wings where I was purposefully pressing hot glue between my fingers.  I burned myself on the fairy wand... the least complicated and fastest part of the whole costume.

Materials Needed:
  • scrap of soft fabric
  • wooden dowel (mine is 1/4" diameter)
  • ribbon
  • tulle scraps (optional)
  • scraps of fabric with fusible interfacing from Appliqued Onsie
Using a small hand saw (I have NO idea what the real name for it is) trim the dowel down to wanted size.  Mine is about 8 inches.

Cut a piece of fabric so it is wide enough to wrap around the dowel and overlap itself 1/4-1/2".  The length should be about 2 inches longer than the dowel.  I'm covering the dowel with fabric instead of painting it to make it soft for my *will be* 5 month old; don't want her whacking herself in the face with something that would hurt.
Glue one end of fabric over the dowel and repeat on the other side.
Then place a line of glue on the dowel and roll one side over.  Then repeat on the other side.
Your wand should look like this now.
It's really up to you to decorate the wand how you want it.  I cut two scraps about the same size from the fabric with the fusible interfacing and made a bow to match the one on the tutu.
I wrapped the fabric pieces and glued them around the top and bottom.  Then I glued a couple of strips of tulle down and glued the bow on top.
I meant to keep all the seams along the same side, but it was late so that didn't really happen.  Whoops.

It turned out great!


In my last post I promised pictures of baby since her costume is complete!  I have to warn you she's pretty cute.  It's also really hard to take pictures of a baby who is wearing wings and doesn't sit up yet... so please just pay attention to the costume and absolute squishiness of my adorable Cupcake Fairy.


See!  She is just full of ooey-gooey cuteness!  Thanks to my sweet husband and awesome sister for helping me take these pictures (yes it was a three person job).  We can't wait for Halloween!

Tell me about you're working on!  What are your kids going to be for Halloween?

Monday, October 17, 2011

Cupcake Fairy Costume: Part 3: Fairy Wings

This next part of the Cupcake Fairy Costume is my favorite... wings!  I was worried that this wouldn't work but it turned out great and was actually pretty easy.

Materials Needed:
  • tulle
  • hot glue gun
  • fabric scraps from the appliqued onsie
  • two strips of 1/4" elastic cut to fit around you child's shoulders
  • floral wire
Floral wire is a thick wire like barbed-wire but it cuts and bends easily.  It come in silver, gold, copper and green.  I liked the green and it happened to cost the least.

Start off by cutting two pieces of wire at the same length.  Length will depend on the size you want the wings to be.  Then cut two more pieces of wire, also the same length but a couple inches shorter than the other set of wire.
Take one piece of wire and wrap one of the ends around the other.  Do the same with the other wire of the same length. 
Mold one wire loop to the shape you want then use that as a template to mold the other wire.  You need them to be as close to the same shape as possible.  Repeat these steps with the other two wires.
When you put the wings together they should mirror each other. These loops are for the top part of the wings.
Lay down a square piece of tulle. It is better to have excess because you can trim it away later. Arrange the wire loop so the tip of the wing is in the center of the square of tulle.  Dot as little hot glue as you can on the tip of the wing and stick it to the center of the tulle square.

Pull the tulle down over the wire and bring together where the wire is twisted together.  Secure with a rubber band.
Repeat with all the loops.  Your should have 4 pieces of wings that look something like this.
Scoot the rubber band down a little and glue around the base of the wing.  Once the glue cools a little but is still soft, squish the glue into the tulle and wires with your fingers.  Trim the tulle to make it less bulky.  Repeat with all the wings.
Arrange the wings with the two larger wings on the top.  Glue one top wing to the base of the bottom wing so the top wing laps over the top of the bottom wing. Repeat with the other set.
Glue the two sides together.  Don't worry if it looks messy at this point.
Glue the elastic to the wings so the loops are on the side that will be against your child's back.  Make a small square of the fabric scraps that has the fusible interfacing on it (this will help prevent fraying) to the wings where the elastic ends are to help keep them attached.
Then cut another scrap of fabric with the interfacing and wrap it around the center of the wings. Glue down with the seam on the side that will go against your child's back.
Now you have a beautiful pair of fairy wings!

There is one more part to the Cupcake Fairy costume coming soon (hopefully tomorrow)!  This will include pictures of a very cute Cupcake Fairy. 


Saturday, October 15, 2011

Cupcake Fairy Costume: Part 2: Tutu

The next part of the Cupcake Fairy costume is a tutu.  What could be cuter than a tutu on a little girl? 
I didn't want this tutu to be too poofy because my baby is only 4 months old and we will be holding her all night.  The more "stuff" a baby has on the more difficult it is to hold her.


Materials Needed:
  • 1/2 elastic
  • tulle (amount depends on how full and how many layers you want it to be)
  • ribbon
Measure the waist of one cute baby (or child)!  My little girl is about 17 inches.
Cut a piece of elastic about 1 inch longer than your your baby's waist, in my case I needed about 18 inches.
Then cut tulle to your desired length.  I like the end of the skirt to hit just above the knee.  The width of the tulle should be the same length as the elastic when it is stretched out as far as it will go.
To cut tulle:  roll it up then just cut with fabric scissors.  I cut 4 pieces of tulle, 2 in light pink and 2 in bright pink.

Layer all the pieces of tulle together.  Tulle can be very hard to work with so I pinned it down to a towel (you can also use an ironing board).  Pin down one layer at a time, building on top of each other.
A helper is needed for this next part.  This lucky winner is my sister Tiffany.  One of you should stretch the elastic across to the pinned tulle while the other pins the elastic to the tulle.  Start at the center and pin the elastic to the tulle.  Unpin the tulle from the towel everywhere but the very ends.  Once all the tulle and elastic are pinned, completely unpin the tulle from the towel.
Sew the elastic to the tulle by stretching the elastic while sewing.  Stretching the elastic allows for the waistband to stretch.  If you don't stretch the elastic during sewing, the thread will be to tight and snap when you stretch the band.
Pin the edges of the tulle together with right sides facing.  Sew one inch in.
Do an extra zig-zag stitch over the elastic band to reinforce it.  Then trim the excess material to about a half an inch and sew open the seam.

The next step is to make a bow.  Now the length of ribbon that you need will depend on how big a bow you want.  Loop the ribbon around back and forth until you get two loops and hanging ribbon on each side.  Clamp slightly off center with an alligator clip then adjust the bow loops.
Take a piece of heavy string or yarn and tie a not around the center of the bow.
This is what the right side looks like so far.
Take a smaller piece of ribbon and tie a simple not.
Trim up the knotted ribbon and twist the ends around so the right side of the ribbon is out.
Using a glue gun, dot some glue on the front of the bow and place the knot on top.  Turn it over.
Put some glue on this side of the bow and glue down one side of the ribbon.  Trim it up and glue down the other side and trip that end up.  You don't want the ribbon to show through onto the other side.
Now you have a beautiful bow!  Mine matches the cupcake on the onsie.
Hand stitch the bow to the skirt on whichever side you want.
So cute and a perfect combination with her Cupcake Appliqued Onsie!


Part 3 of the Cupcake Fairy Costume is my favorite... Fairy Wings!  I will be posting about it within the next couple of days.